Culinary Rhapsodies: Apple Pie (with a sheet pan)
22 Nov 2012

This is one of our favorite apple pie recipes this year. We’ve made it several times for several people. They’ve all loved it so much and it disappeared so quickly, that each time, we’ve had to double the lot for the recipe. One lot just wasn’t enough! This apple pie recipe was printed in 1994 and was written by Katsuyo Kobayashi 小林カツ代. Her book is called: “Kobayashi Katsuyo’s Cake and Pie Fundamentals/Basics)” 小林カツ代のケーキ&パイの基本. Yup! It’s another one from mom’s cabinet! This recipe takes a bit of effort but that’s what makes it all so yummy! It’s one of those pies you can eat the entire thing by yourself because it’s got an amazing crust that’s flaky, yet moist, and a filling that’s perfectly sweet (not obnoxiously sweet). We usually whip up some cream to go with it and enjoy it with a nice cup o' tea!
Ingredients:
For the pie crust:
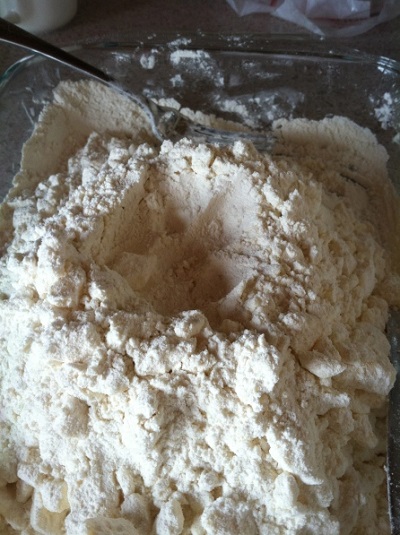
• 120 g bread flour
• 120 g all-purpose flour
• 200 g butter (cold! don’t make it room temperature!)
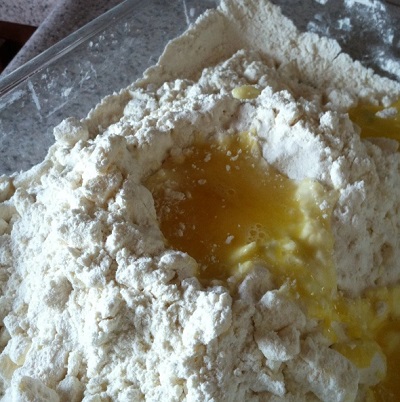
• 1 egg (beaten)
• 2 tablespoons of water
For the apple filling:
(my husband enjoys lots of filling so if you’re like him, double the lot below)
• 4 apples
• 1 lemon freshly squeezed
• 8 tablespoons of sugar
• Cinnamon (as little or as much as you’d like. We usually put a pinch in.)
For looks (egg wash):
• 2 eggs (beaten)
We’ve changed the presentation of this pie. The original recipe asks that the smaller dough be on the bottom and the larger dough be on the top. She also makes it flat with what my husband calls spaghetti strands over the pie for ventilation. We didn’t like the way it looked so we swapped the dough around. We placed the larger dough on the bottom and the smaller on the top. We overlap the bottom with the top and crimp it as if we would a double crust pie. See below for more details.
Directions:
Pie Filling:
Apple Filling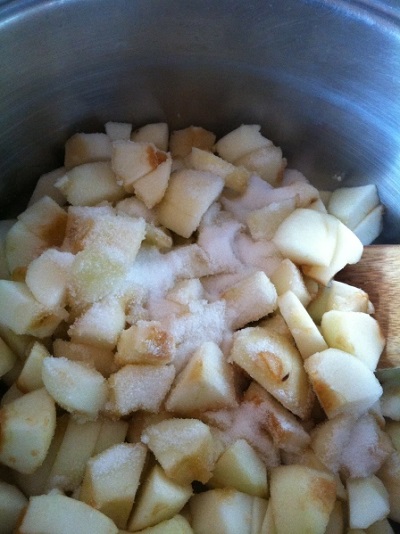
1. Peel and core the apples. Cut them into bite size pieces. In a medium size pot, mix the cut apples, lemon juice, sugar on medium high heat until it’s soft, changed into a golden yellow hew and liquid has evaporated. It’s okay if there’s a bit of liquid left so it’s not dried out. Place aside to cool.
Pie Crust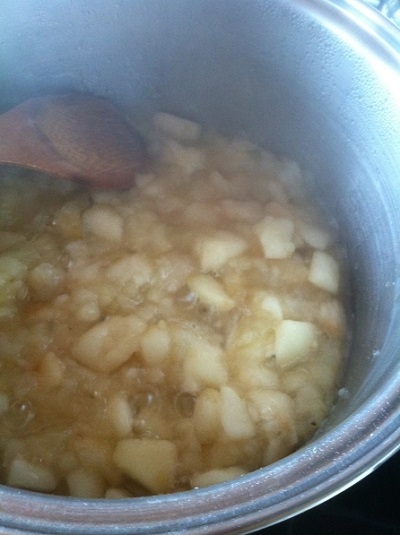
- Sift the dry ingredients for the pie crust into a large flat plate. (I use a pyrex baking dish but anything flat that contains the flour is fine.) Take the butter and cut it into ten pieces. Place the butter on the dry ingredients. You can use a pastry scraper or use your hands for this next step. (We use our hands because we don’t have a pastry scraper. It’s on our “want” list!) If you’re using a pastry scraper, cut the butter into the dry ingredients. If you’re using your hand, pinch the butter into the dry ingredients until they are the size of peas. Do this step quickly so that the butter doesn’t melt! Especially if you’re using your hands!
Depression
- Build it into a mound and make a depression (a well) in the center. EggAdd the egg into the well. Using your finger tips, mix it in by pinching the egg into the mixture.
Dough
- Add water into the mixture little at a time and mix that in with the fingertips. When you’re about done mixing, take your hand and mix it almost as if you’re grabbing the dough. Put the dough into one big lump (doesn’t have to be perfectly round. It just needs to be put together). Wrap it tightly and well into plastic wrap and place in the refrigerator for 20 minutes.
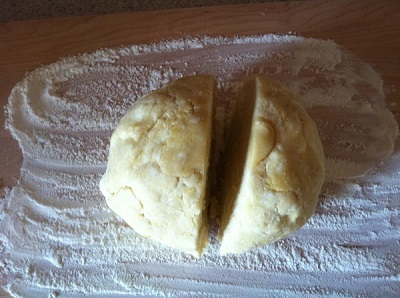
5. Take the dough out of the fridge and place it on a well floured surface. Flour the dough as well. Cut the dough in half but make sure one is larger than another. It should be about 55 – 45 or 60 – 40 and NOT 50 – 50.
Rolling out dough
Fold the dough in three.
- Start with the smaller dough. Roll the dough out into a rectangle (horizontal) about half an inch thick. Then fold it in three by folding the right side into the center and folding the left side into the center.
After tri-fold, turn the dough 90 degrees and roll out.
Turn the dough 90 degrees. Roll out the dough the same way as before making sure you are creating a rectangle horizontally. Repeat the process of rolling, folding and turning 5 times. Make sure not to add more flour onto the pastry or your rolling pin. Finish preparing this dough by rolling it out to be about 3 mm in thickness, 15 cm x 25 cm (between 5 in x 9 in and 6 in x 10 in). Wrap it up in plastic wrap and place it in the fridge for 20 minutes.
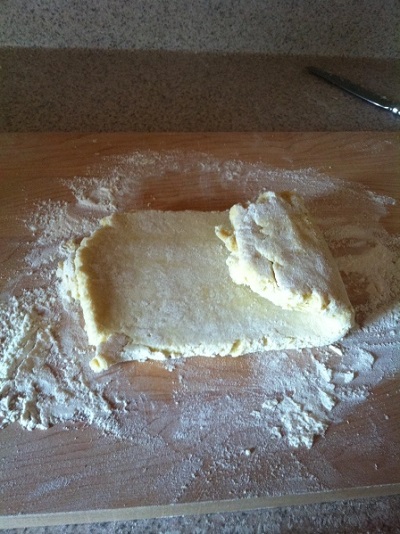

7. Take the larger dough and repeat 6. The dough should be about quarter of an inch larger than the smaller dough. Wrap it up in plastic wrap and place it in the fridge for 20 minutes.
Preheat your oven to 475 degrees F.
This is where we alter the recipe because we don’t like the way the recipe book “designed” the top of the pie. Below is our version of it. As a side note, my darling husband loves the apple filling and I seem to always have too much dough. What I do then is pile the apple filling high so I have about an inch and a half to two inches of the bottom dough left on the borders. I then cut half a half an inch off with a knife and place it on the side to use for decorating.
- Line a cookie sheet with parchment paper/silpat. Place the large dough on the cookie sheet. Place the apple filling that you had made previously and cooled onto the center of the dough. Make sure you leave enough room around the border without any filling!
- Place the smaller dough to cover the dough and apple filling. Wrap the excess dough over the top dough. Take your finger and crimp it as you would a double crusted pie. (If you don’t know how to do this, check this video out. The first 28 seconds is all you need to watch for this purpose.)
- Take a sharp knife and make slits in the pie. You need at least 4 or 5 but we make about 10 – 20 depending upon the size of the pie and also looks. (See photo for visual.) Using a pastry brush, spread the egg wash over the pie. (If you don’t have a pastry brush, no worries, just dip your finger into it and slather it on evenly.) You don’t have to do this next step if you don’t have extra dough you cut off from before. We have fun making little leaves and flowers to stick onto the pie. You can put anything you want to on it, just have fun! It brings me back to when I used to cut shapes out of play dough! If you do put decorations on, make sure that you brush the tops of them with the egg wash.
- Place the pie into the oven for 7 minutes (475 degrees F). This part is important! Don’t forget to turn the temperature down!! Then lower the temperature to 400 degrees F for 25 minutes or until golden brown.
- Take out of the oven, cool, eat and enjoy! (My husband says a dollop of cream makes it extra yummy!)