Arts & Craft: Car Mat
11 May 2021
Our 4 year old was given a vehicles mat that came as an extra to a Christmas present he received. Unfortunately, it wasn’t something we wanted to keep for multiple reasons (spelling mistakes, creepy pictures, etc.) so we told him we needed to get rid of it in exchange for a new one.
As parents, we wanted one that was:
- easy to wash
- portable (not a rug)
Toddler wanted:
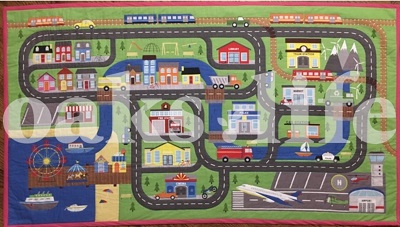
- roads and parking spaces
- runway for an airplane
- train tracks
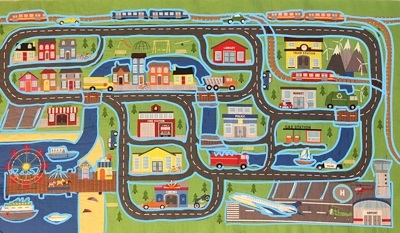
I looked online and found some car play mats on etsy. I showed several to our child (not looking at the price at first) and the one he chose was well over $100 for a hand sewn car mat. That was WAY beyond our budget for something like this. Since I had made the mistake of showing him and telling him we’d get one he liked (note to self: check the prices first next time), I wanted to keep my word. (That’s important around here). After a bit of digging, I found the fabric he liked that the vendor was using. It was called “Things That Go” by Katie Webb Design for Cloth Works.
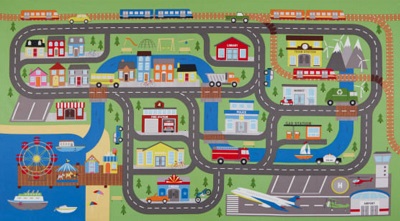
For those who might want this mat too, there seems to be 2 types of colors for the same fabric. Our child chose green instead of the light green/yellow tinge.
I sent out a few asks to etsy dealers that sold this fabric. Being a first-time car mat maker, I wasn’t sure what I needed. Many were prompt, few were polite and only one was thorough; so we went Lightning Bugs Quilting Studio. Theresa was kind and patient as I asked multiple questions about this fabric.
I then reached out for help to a mom I knew when we lived in Philadelphia, Megan, who is good at sewing. I am so grateful for patient, wonderful people! I could not have done this without her. She sent me several links which I’ll include here that helped me as I worked on this project. Since I did not have a good sewing machine (I found one in the bottom of my mom’s linen closet that was manual…as in my husband had to keep his hands on the fabric while our child turned a button to make it go and make it stop) so I chose to do this by hand (except for the bias which I’ll talk about later).
My first question to Megan was why does this need to be a quilt? Many of the vendors suggested it and I didn’t understand why. Megan’s explanation helped me a lot:
I'd suggest making it a quilt (and this sounds like the vendors' thoughts too: Backing, border and batting are all parts of a quilt). If you just do the two layers of fabric, it won't have enough stiffness to lay flat and as he drives over it, it may bunch up or even pull into the wheels. And even with the two layers, you'd need to quilt them together to ensure that they don't shift and bubble up. (If you sew two pieces of fabric just around the edges, they have no reason to stay put in the middle and will bubble or shift. Quilting ties the layers of the quilt together so they cannot shift. It also makes it more durable). You could use a stiffer backing fabric (e.g. canvas) and skip the batting, but you would still want to quilt it because the top fabric will slip around on the bottom.
Materials
With that explanation, I understood why it needed to be a quilt. She also helped me create a materials list so I knew what to get and here are the items I purchased for this project. The total cost came out to under $35. Beats $100!! (I know it’s a cost for labor but that’s not in my budget and this was a fun project so win win!)
- 24 x 44 inch Things That Go by Katie Webb Design for Cloth Works for $10.55
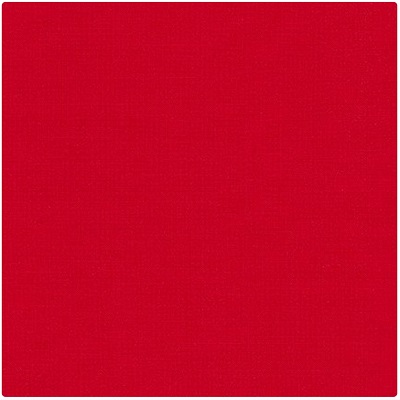
I recently found the same fabric online for $4.99 at bugfabric.com so if you’re on a budget, search around with a simple google search. I still recommend Theresa because I like supporting local stores that have kind owners! - 2 yards of Robert Kaufman, KONA Cotton in Cardinal for $9.25
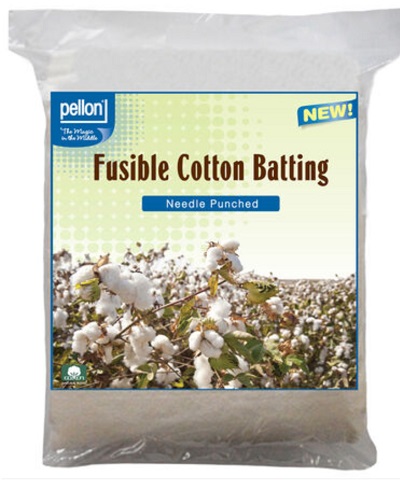
(we had our child choose a solid color from the same etsy store and I only needed 1.5 yards for this project but we figured we’d buy 2 yards to use the other half for some other project in the future). - 34 x 45 inch Fusible Cotton Batting $8.49
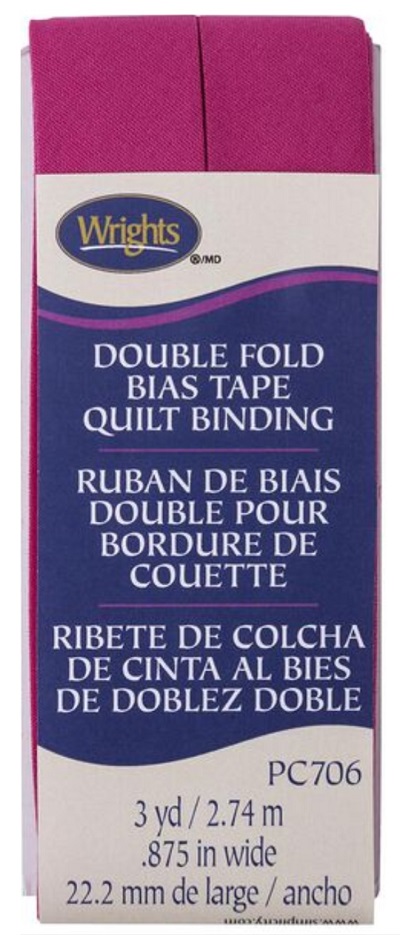
(bought it online with a free shipping coupon from Joann’s so it went down to $5.43 with tax) - Two 3 yard packages of Wright’s Double Fold Bias tape in magenta $3.99
(we bought it at Joann’s with a 50% off coupon for one item) - Quilting thread in river blue $3.49
(we’ll use these again, there’s so much left!)

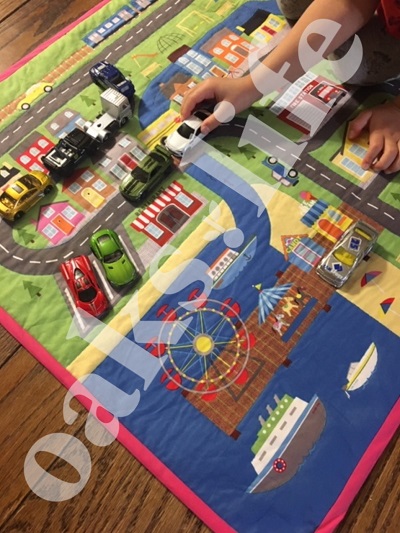
This is our toddler’s mat, so we allowed all the colors to be chosen by the 4 year old. I thought the colors would clash, but it actually came out real nice. We’re all about allowing them to have choices and sharing their opinions, thoughts and preferences so this is an area we allow him to choose freely. We suggested other colors but ultimately, it’s his decision. He’s playing with it and we want him to love it.
(Also, to add to your list to buy if you don’t have them lying around from dry cleaners is safety pins. I found them easy to use and I only used 4 total, one for each corner.)
Fusible Batting
The fusible batting was GREAT. For my first time sewing, I found it super helpful that the fabric was attached to the batting. Think sticker on paper. The bottom fabric still needed to be pinned to stay in place but having at least one fabric stuck to the batting, I think, made it super easy for me. (Also, the glue on the batting washes out when you launder it so that’s why it also needs to be quilted.) It’s quite easy to follow the directions written on the batting. Here’s what I did:
- Wash the fabrics in cold water and hung it to dry.
 Megan suggested I wash as I would when it was done.
 - When it was still lightly damp to the touch, I took out an iron and a board to iron out each fabric.
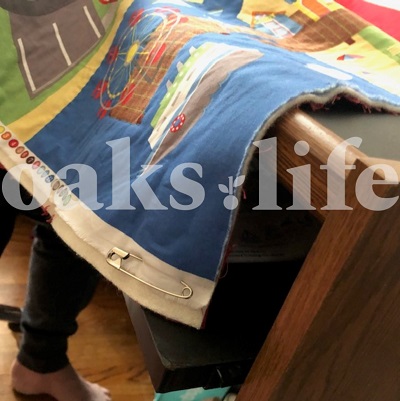
- Once they were each ironed, I placed the red on the bottom, the batting in the middle, and the things that go fabric on top and pinned the corners with safety pins. Because the ironing board is quite small, I took a thick table cloth, doubled it and placed it directly on the wooden floor. The table cloth I had was large enough that I could iron the fabrics together straight.
- After ironing by following the directions in the batting, I kept the safety pins in place and cut the top and bottom to line up with the “Things That Go” fabric. However, I kept the sides because I wasn’t sure yet how much to leave and how much to cut for the bias. Also, it was easier so I could pull it taut occasionally to make sure I was quilting well.
Quilting
Megan sent me some quilting tutorials which were super helpful to understand what quilting looked like. However, knowing my toddler and his preferences, I knew he’d not be happy with me if there were lines everywhere going up and down or across his mat. So, I decided that I would trace along the roads and train tracks. When I took a peak at the etsy person selling this, she used a sewing machine so I could see the sewing through buildings which I didn’t like. This is also another reason I chose to do this by hand because I could go around buildings and shapes without it standing out. Megan helped outline as well to give me an idea of what I would need to do and that I should quilt no more than 4” apart. Keeping that in mind, this is where I sewed. It’s hard to see in a photo so I’ve drawn lines where I sewed in blue so you can see.
It was too hard to try to take a photo of the train track to show you but I sewed twice in between each rail so that you don’t see the stitch too much. It took me about 5 days to quilt the entire thing. I worked on it while the kids were asleep and some occasional afternoon/evenings where hubs played with them. Our toddler wanted to sew some parts so he helped me hand sew here and there. My friend Amy sent me this link that was helpful to make sure you can’t see the stitching come through the back.
Bias Tape
This took a while to do. Mostly because, as I mentioned earlier, we didn’t have a proper sewing machine and our 4 year old wanted to help. These tutorials from The Small Circle and Professor Pincushion helped for the first part of the bias sewing. We decided we’d sew the bias together with the sewing machine and also sew the first fold with the machine as well. The rest, I did by hand and for that, this video from The Crafty Gemini was helpful. It took us half the day to machine sew the bias. It took me a day to hand sew the rest of the bias and finish it up.
Result
We’re all quite happy with the result and most importantly, it’s played with often. This was such a fun family project and we’re now thinking of what else we could do together. Hope this was a helpful post and you’ll try creating a car mat for your kids too!